
Size
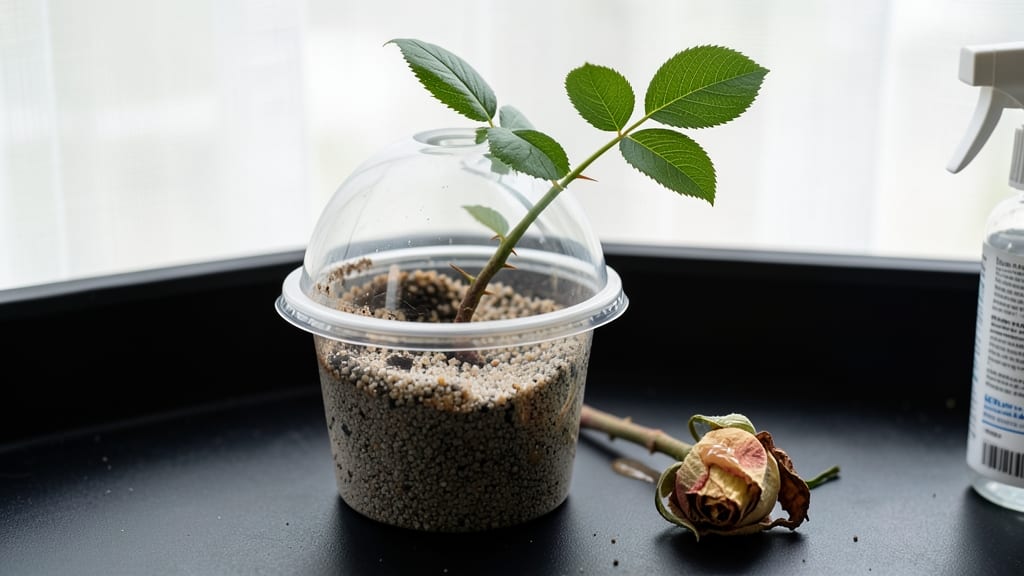
Growing a rose bush from a cut rose is easier than you think—just a vase, patience, and this simple trick. 🌹 I’ve turned dozens of store-bought roses into thriving plants, and you can too.
The secret lies in choosing the right stem, giving it the perfect start, and nurturing it through the slow but magical rooting process.
Start with a healthy stem from a blooming rose—look for one with at least three buds and no signs of disease. Cut just below a node (the tiny bump where leaves grow) with sharp scissors, then strip the lower leaves and dip the cut end in rooting hormone.
Place it in water or moist soil, keeping it in bright, indirect light.
Roots can take 4-6 weeks to form, so consistency is key. Mist the cutting daily to maintain humidity, and avoid direct sun to prevent wilting. Once roots appear (gently tug to test), transplant it into soil and watch as it grows into a full bush with year-round blooms.
This method works for hybrid teas, floribundas, and even climbers—just adjust care based on your climate. The reward? A free, fragrant rose bush that’s uniquely yours. Ready to give it a try?
📚 In This Guide
- What you need
- Instructions
- Tips and common mistakes
- Wrapping up and next steps
What you need
- ● 1 healthy cut rose: Choose a rose with at least 3-4 nodes (the small bumps where leaves grow) and no signs of disease. Hybrid teas or floribundas work best! 🌹
- ● Sharp pruning shears or scissors: Sterilize them with rubbing alcohol to prevent bacterial contamination.
- ○ Rooting hormone (optional but recommended): A small jar or powder to encourage root growth (e.g., Rootone or Clonex).
- ● Clean glass or jar: A 16–20 oz mason jar or vase with a narrow neck works perfectly.
- ● Water: Room-temperature, chlorine-free (let tap water sit out for 24 hours if needed).
- ● Patience and sunlight: A sunny windowsill or grow light setup (6+ hours of indirect light daily).
- ● Perlite or small pebbles: Add a layer to the jar’s bottom to prevent rot and improve oxygen flow.
- ● Humidity dome or plastic bag: Creates a mini greenhouse effect to speed up rooting (remove once roots appear!).
- ● Potting soil and small pot: For transplanting after roots form (use a well-draining mix like 50% potting soil + 50% perlite).
- ● Fertilizer (diluted): A balanced houseplant fertilizer (e.g., 20-20-20) to nourish your new rose bush after transplanting.
Step-by-Step instructions for growing a rose bush from a cut rose
Here's how to turn that wilted bouquet into a thriving rose bush—no fancy tools needed.
🌱 Step 1: Select and Prepare the Stem
Choose a healthy stem with at least 3-5 nodes (those little bumps where leaves grow). The stem should be 6-12 inches long and free of flowers or buds. Cut just below a node at a 45-degree angle using clean scissors or pruners—this increases surface area for root growth.
Remove all leaves except the top 2-3, and trim any remaining leaves in half to reduce moisture loss. Place the cut end in a glass of room-temperature water and let it sit for 24 hours. This helps the stem absorb water and heal slightly before planting.
💧 Step 2: Root the Stem in Water
Fill a clean glass or jar with 2-3 inches of water, ensuring the cut end is fully submerged. Change the water every 2-3 days to prevent bacterial growth. Place the jar in a spot with bright, indirect light—a windowsill away from direct sun works best.
Within 2-4 weeks, you should see small white or yellow roots sprouting from the cut end. Once roots reach 1-2 inches long, your stem is ready for planting. Don’t wait too long—roots over 3 inches can struggle to adapt to soil.
🪴 Step 3: Plant the Rooted Stem
Fill a small pot (4-6 inches wide) with well-draining potting mix. Make a hole deep enough to bury half of the stem (about 2-3 inches). Gently place the stem in the hole, pressing the soil lightly around it to secure it without compacting.
Water thoroughly until water runs out the drainage hole, then let it drain completely. Place the pot in a spot with morning sun and afternoon shade for the first 2 weeks to help it adjust. Avoid direct sun until new growth appears.
☀️ Step 4: Encourage Growth and Harden Off
Once new leaves appear (3-6 weeks after planting), gradually introduce more sunlight. Move the pot to a sunnier spot over 7-10 days, increasing exposure by 1 hour daily. This prevents shock and helps the plant toughen up.
After 4-6 weeks, when the stem has 4-5 sets of leaves, you can transplant it outdoors (if using a garden bed) or keep it in a larger pot. Mulch around the base with 1-2 inches of organic mulch to retain moisture and protect roots.
✂️ Step 5: Prune and Care for Your New Rose Bush
Once established, prune back any dead or weak growth to encourage stronger stems. Pinch off the first 2-3 blooms that form—they’re weak and use energy the plant needs for root development. Water deeply once a week, letting the soil dry slightly between waterings.
Fertilize lightly with a balanced rose fertilizer every 4-6 weeks during the growing season. With patience, your cut rose will bloom again in 1-2 years, proving that even a single stem can become a bush!
Tips & tricks for growing a rose bush from a cut rose
Here's what nobody tells you about turning a single rose into a thriving bush—these tricks make all the difference.
Selection is Everything: Look for stems with 3-5 nodes and at least 6 inches of length—longer stems give you more options for pruning later. Avoid stems with flowers or buds, as they'll drain energy from root development. I've tried this with hybrid teas and grandifloras, and they all work, but climber roses tend to be the most resilient for beginners.
The 45-Degree Cut Matters: That angled cut in Step 1 isn't just decorative—it creates more surface area for water absorption and root growth. Use clean scissors or pruners to make the cut just below a node. If you don't have a ruler, your thumb works perfectly for visualizing the angle. The extra surface area can make the difference between roots forming in 2 weeks versus 3.
Lighting Secrets: Bright, indirect light is key during the rooting phase (Step 2). East-facing windows are ideal—morning sun warms the water gently without scorching the stem. If you only have south or west exposure, place a sheer curtain between the window and your jar to diffuse the light. I've seen stems wither in just days when placed in direct afternoon sun, even with regular water changes.
Rooting Timeline: The 2-4 week window for root development can feel like forever, but patience pays off. Check for roots by gently tugging on the stem—if you feel slight resistance, roots are forming. Once they reach 1-2 inches, don't wait another day to plant! I've had stems with 3-inch roots struggle to adapt to soil, so timing is everything here.
Pro Tips for Can I Grow A Rose Bush From A Cut Rose
- Here's what nobody tells you about turning a single rose into a thriving bush—these tricks make all the difference.
- Selection is Everything: Look for stems with 3-5 nodes and at least 6 inches of length—longer stems give you more options for pruning later.
- The 45-Degree Cut Matters: That angled cut in Step 1 isn't just decorative—it creates more surface area for water absorption and root growth.
Frequently asked questions
Got questions about growing a rose bush from a cut rose?
You’re not alone! Here are some of the most common queries—plus clear, actionable answers to help you succeed in your floral adventure.
Can I grow a rose bush from any cut rose?
Not all roses will root successfully. Look for hybrid tea, grandiflora, or climbing roses—these types root best. Avoid sprays (like florist roses) or heavily treated blooms, as they may contain growth inhibitors. Stick to organic, pesticide-free roses for the best chance!
How long does it take for a cut rose to grow into a bush?
Patience is key! With proper care, you’ll see roots in 3–6 weeks in water, and a small shoot may emerge in 2–4 months. Transplanting into soil and waiting another 1–2 years could yield a mature bush. Some roses bloom faster, while others take longer—so don’t rush!
What if my cut rose doesn’t root in water?
Don’t give up! Try these fixes:
- Change the water every 2–3 days to prevent bacteria.
- Use a rooting hormone (like powder or gel) to boost success.
- Trim the stem just below a node (a tiny bump) for fresh growth.
- Move to indirect light—direct sun can overheat the water.
Can I grow a rose bush from a cut rose year-round?
Timing matters! The best time to start is in early spring or late summer, when roses are actively growing. In winter, roses are dormant, making rooting difficult. If you’re in a warm climate, you might succeed year-round—but expect slower progress in colder months.
Will my homegrown rose bush look like the parent flower?
Not always! While the bush may share traits (like color or shape), it might not be an exact match. Roses can revert to their original wild form or develop slight variations. Think of it as a fun surprise—your new bush could be even more unique than the cut rose you started with!
What if my rose bush doesn’t bloom?
First, give it time—young bushes focus on root and leaf growth before blooming. To encourage flowers:
- Prune wisely in late winter to promote new growth.
- Fertilize with a balanced rose food in spring.
- Ensure full sun (6+ hours daily) and well-draining soil.
Wrapping up and next steps
Growing a rose bush from a cut rose is a rewarding journey that blends creativity with patience—and yes, it’s totally possible! With the right materials, a little care, and a dash of optimism, you can transform a single bloom into a thriving plant.
Whether you’re a green thumb or a beginner, this project is a fantastic way to extend the life of your favorite roses while adding beauty to your garden.
Ready to take the next step? Start by gathering your supplies, follow the steps with confidence, and soon you’ll be enjoying homegrown roses year after year. Happy growing! 🌸