
Shrubs
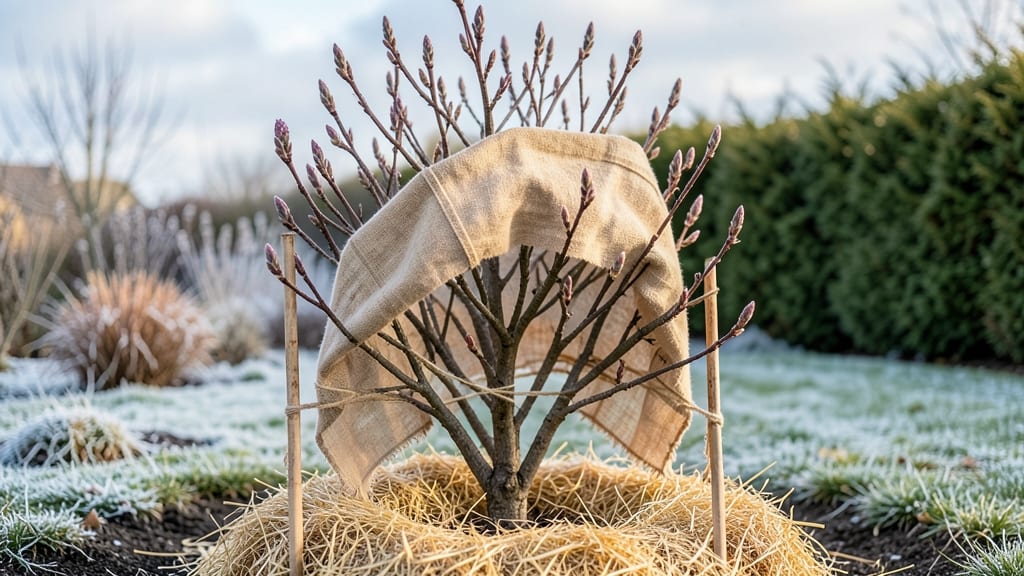
Wrapping bushes for winter isn’t just about survival—it’s about giving your plants a fighting chance against frost, windburn, and temperature swings that can turn lush shrubs into sad, crispy skeletons by spring. 🌿 I’ve learned the hard way that skipping this step means waking up to split bark, frozen roots, and a garden that looks like it’s been hit by a winter storm—even in Zone 6, where we get plenty of cold but not always deep freezes.
The secret isn’t fancy materials—it’s knowing how to layer protection just right. Burlap breathes better than plastic, frost cloth traps warmth without suffocating, and wrapping techniques vary wildly depending on whether you’re protecting a rose bush (delicate canes!) or a tough boxwood (which just needs a little insulation).
My first attempt with plastic sheeting actually killed a hydrangea—don’t make that mistake.
By the time you’re done, your bushes will look like they’re wearing cozy winter sweaters, ready to brave the cold without a single browned leaf or cracked stem. The payoff?
Plants that bounce back faster in spring, with stronger growth and fewer pests because the wrapping also keeps critters from nibbling on weak wood. It’s not just about survival—it’s about setting them up for a showstopping next season.
Works for everything from roses to rhododendrons, and adapts to your climate—whether you’re in a harsh Zone 4 or a milder Zone 7 with occasional dips. Here’s how to do it right, step by step, without overcomplicating things.
📚 In This Guide
- What you need
- Instructions
- Tips and common mistakes
- Wrapping up and next steps
What you need
- ● Burlap or landscape fabric: 1–2 rolls (10–15 ft wide, 50–100 ft long). Choose breathable fabric to prevent moisture buildup.
- ● Twine or garden ties: 50–100 ft (jute or plastic). Avoid wire, which can damage bark.
- ● Stakes or metal rods: 4–6 (6–12 inches long) to secure fabric in place.
- ● Pruners or sharp scissors: For trimming fabric to size.
- ● Measuring tape: To ensure fabric fits snugly without gaps.
- ● Heavy-duty stapler (garden-grade): For securing fabric to stakes or frames.
- ● Anti-desiccant spray (e.g., Wilt-Pruf): 1–2 sprays per bush to lock in moisture.
- ● Mulch (straw or shredded leaves): 2–3 inches thick at the base for extra insulation.
- ● Plastic sheeting (clear or black): For extra cold protection in harsh climates (use sparingly!).
Step-by-step instructions for wrapping bushes for winter
Here's the foolproof method I use every year to protect my shrubs from harsh winter damage.
🪴 Step 1: Choose the Right Materials for Protection
Gather burlap sacks, landscape fabric, or tree wraps—these are your best bets for breathability while blocking harsh winds. I avoid plastic sheets because they trap moisture and promote rot. For extra insulation, add mulch around the base of the bush up to 3 inches deep.
Check for any weak or damaged branches first. Prune back any dead or broken stems before wrapping—this prevents trapped moisture from worsening decay. You'll know you're ready when the bush looks healthy and sturdy, with no loose or brittle limbs.
✂️ Step 2: Wrap the Bushes Properly
Start by loosely wrapping the burlap or fabric around the bush, leaving the base uncovered. Tuck the material in gently but don’t pull too tight—you want room for air circulation. Secure it with twine or soft ties, making sure not to constrict the stems.
For larger bushes, overlap the fabric by 6-8 inches to ensure full coverage. If you're using multiple layers, leave small gaps at the bottom to prevent moisture buildup. The goal is to shield the bush from wind and snow while still allowing airflow—this keeps the plant healthy through winter.
💧 Step 3: Add Mulch and Final Touches
Spread the mulch evenly around the base of the bush, creating a 3-inch-thick layer that extends out to the plant’s drip line. This helps insulate the roots from freezing temperatures. Avoid piling mulch against the trunk itself—keep it at least 2 inches away to prevent rot.
Give the wrapped bush a final check for loose fabric or exposed branches. If any areas look vulnerable, add extra layers of protection. Once everything is secure, step back and admire your work—your bushes are now winter-ready and protected from frost damage.
⏰ Step 4: Monitor and Adjust Through Winter
Check your wrapped bushes every 2-3 weeks to ensure the fabric hasn’t shifted or become waterlogged. If snow accumulates, gently brush it off to prevent weight damage. You’ll notice any issues like mold or excessive moisture early, giving you time to adjust before it’s too late.
In early spring, remove the wrapping as soon as temperatures rise above 40°F to allow the bush to wake up naturally. Don’t rush—wait until the last frost date in your area to avoid shocking the plant. With proper care, your bushes will emerge strong and ready for the growing season.
Tips & tricks for perfect winter bush protection
Real talk: I've lost too many bushes to winter damage over the years, and these are the lessons I wish I'd known sooner.
Material Selection Matters: While burlap and landscape fabric are the stars, don't overlook tree wraps for smaller branches—they're more secure against wind. For evergreens, consider adding a layer of burlap between the fabric and branches to prevent needle browning from trapped moisture. I've also found that breathable mesh wraps work well for delicate shrubs like hydrangeas.
The Wrapping Technique: When securing with twine, I make a loose figure-eight pattern around the bush rather than wrapping in a spiral. This prevents the twine from digging into the stems as the bush shifts with wind. For extra-large bushes, I use soft plastic zip ties instead—they're more secure than twine but still allow flexibility. Remember, the fabric should move slightly with the wind, not stay rigid.
Mulch Placement is Critical: The 3-inch layer of mulch should extend out to the plant's drip line, not just the base. This creates a protective dome that insulates roots from all directions. I also recommend adding a 1-inch layer of straw on top of regular mulch—it provides extra insulation against extreme cold snaps. Just avoid piling mulch against the trunk to prevent rot.
Spring Removal Timing: The 40°F threshold is a good rule of thumb, but I also check for bud swell on the bushes. When you see new growth starting, that's your cue to remove the wrapping. I've found that removing too early can shock plants that are still dormant, while waiting too long can trap emerging shoots and cause damage.
Pro Tips for Wrapping Bushes For Winter
- Real talk: I've lost too many bushes to winter damage over the years, and these are the lessons I wish I'd known sooner.
- Material Selection Matters: While burlap and landscape fabric are the stars, don't overlook tree wraps for smaller branches—they're more secure against wind.
- The Wrapping Technique: When securing with twine, I make a loose figure-eight pattern around the bush rather than wrapping in a spiral.
Frequently asked questions
Got questions about protecting your shrubs from winter’s chill? You’re not alone! Here are some of the most common concerns—and straightforward answers—to help you wrap bushes like a pro.
When is the best time to wrap bushes for winter?
Wrap your bushes after the first hard frost but before heavy snow or freezing temperatures set in—typically late fall (November) in most regions. This gives plants time to enter dormancy while shielding them from sudden cold snaps. Check your local frost dates for precision!
What if I forget to remove the wrapping in spring?
Don’t panic! Removing wraps too late can trap moisture and cause rot or pests. Aim to uncover bushes by early spring (March in many zones). If you’re late, gently peel back the wrap and check for mold or dampness—air them out immediately if needed.
Can I use plastic sheeting instead of burlap or frost cloth?
While plastic can work, it’s risky! Plastic traps heat and moisture, which can suffocate roots or encourage fungal growth. Opt for breathable materials like burlap, frost cloth, or landscape fabric. If you use plastic, leave small vents or remove it during sunny days to prevent overheating.
How do I protect young or newly planted bushes?
Young shrubs need extra TLC! Wrap them snugly with 2–3 inches of mulch around the base (but not touching the stem) and use a thicker layer of frost cloth. Add a stake or cage to keep the wrap secure against wind. Water deeply before wrapping to prevent drought stress.
What if pests or rodents chew through the wrapping?
Pests love winter snacks too! Use metal mesh or hardware cloth under the wrap to deter critters. For added protection, sprinkle diatomaceous earth (food-grade) around the base. If you spot damage, repair the wrap immediately and check for nests or burrows.
Does wrapping work for all types of shrubs?
Not all shrubs need wrapping! Evergreens (like boxwoods or junipers) benefit most, while deciduous shrubs (e.g., hydrangeas) often only need mulch. Research your specific plant—some, like rosemary or lavender, thrive in cold and don’t need extra protection.
Wrapping up and next steps
Wrapping your bushes for winter is a simple yet powerful way to protect your plants from frost, wind, and harsh conditions—ensuring they thrive when spring arrives! 🌿 With the right materials and a little effort, you can safeguard your shrubs and even extend their lifespan. Now’s the perfect time to act: check your garden, gather supplies, and give your plants the cozy care they deserve before the first freeze!
Ready to get started? Pick a calm day, follow the steps, and watch your garden flourish next season! 🌱